Creating Keywords using RegEx
Workflow allows you to parameterize the settings of each component in the flow and make decisions optional using variables. You can read extended information about variables and their format in the article [here]. This article will explain in close detail how to use RegEx (Regular Expressions) to create Keywords. RegEx will read the file name for data, extract that data, and pair it with a Keyword. RegEx is available using the "Hotfolder" input method.
Click the RegEx builder to start:
The RegEx builder will ask you to open a sample file. In this example, we will use a file named "Bike_5pcs_3mm.tif".
You should now type or select (from the drop-down menu) your Separator. In our example file, the separator is an underscore. After entering the separator, click "Parse."
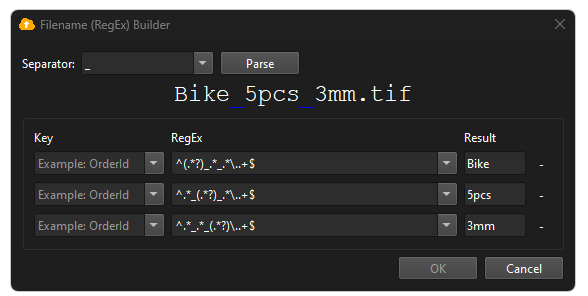
The builder will then show you the data that it has extracted from the file name:
In this example, we want to use "5pcs" as the number of copies required and "3mm" as the amount of bleed to add to the image. The important information needed from this is the integer (number), so select "Number" from the drop-down menu:
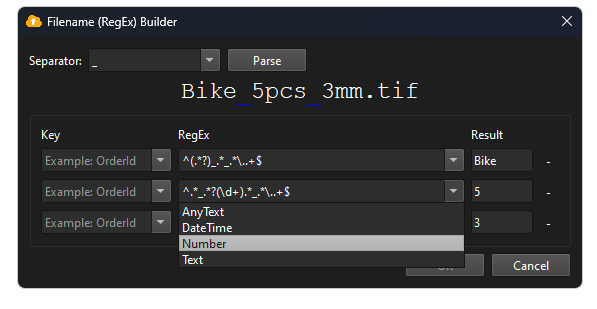
In the "Result" column, you can see the data extracted is now "5" for copies and "3" for bleed. We now need to pair these with Keywords by typing in the Keyword column:
"Copies" is a reserved Keyword and can be selected from the drop-down menu. "Bleed" is a custom keyword that is manually typed. The final step in the RegEx building is to delete the row that is not required. In this example, we don't need the result "Bike," so it can be deleted using the [-] button:
You can now click "OK" to add the RegEx to your input:
Click the "Load Sample" button and select the file. You can now confirm you have configured it correctly based on the results given:
You can use the "Bleed" Keyword in your Bleed component in your Workflow:
This Workflow will now take the "3" from the filename "Bike_5pcs_3mm.tif" and link it to the Keyword "Bleed". In the variable tab of my Bleed component, the "{Key:Bleed}" text will be replaced with the Keyword data and the result will be "3 mm, 3mm, 3mm, 3mm" which will indicate 3mm bleed on all four sides.
Related Articles
Workflow - Working with Variables
Workflow allows you to parameterize the settings of each component in the flow and make decisions optional using variables: There are 3 different types of variables: Keywords: User data generated from XML, JSON, XLSX, CSV, Database or RegEx Job ...Variable Data Printing (VDP)
The variable data process involves a template file, in which PlaceHolders and special keywords are defined. When Variable Data is used, these PlaceHolders and keywords will be replaced. In the Editor, Variable data can be done by importing files in a ...Variable Data (VDP)
What is Variable Data? Variable Data refers to the ability to dynamically insert personalized or changing content (e.g., names, images, barcodes) into templates at print time. Also check our video on template creation and database linking How do I ...Creating a new Workflow
To create a new Workflow you first need to open the Workflow application. On a Windows PC, you will find it here: C:\Program Files\PrintFactory, and on macOS, here: HD/Applications/PrintFactory. After opening the application you need to click the ...Trim and Bleed Tool
The Trim and Bleed tool automates file preparation for True shape nesting. With this tool, Documents no longer require a CutContour or Spot for tool mapping to allow TSN. After Trim and Bleed tool below, the files are ready for the next step: True ...