What
When there is the need to print the same output on different printers, same printers in a pool and across different batches of media or even different substrates then VISU delivers a number of methods to achieve it.
How
Below we discuss the methods available to achieve this, followed by some use cases.
A. Methods:
- Visual Match rendering intent
- Printer re-calibration
- Printer Simulation
- Profile tuning
- Light Adaptation tool
1. Visual Match
The Visual Match rendering intent is the most versatile method. This method works across several media types, ink types and printers. All output is creating a common appearance by using a normalization space as target (like for example ISO Coated v2 or SWOP). The grey axis and the biggest part of the image are printed using the same color (absolute colorimetric). Depending on how much compression is needed the edges of the gamut are compressed perceptually, retaining the detail and color difference and avoiding flatting of color.
This method is the right choice when needing a common appearance over different substrates and when needing to match commercial print jobs.
The Visual Match rendering intent is stored in the same named Variant of the PMM and automatically created when creating the printer profile. At the moment a job is received with a normalization space it will automatically create a DeviceLink between the printer space and the normalization space if it does not yet exist.
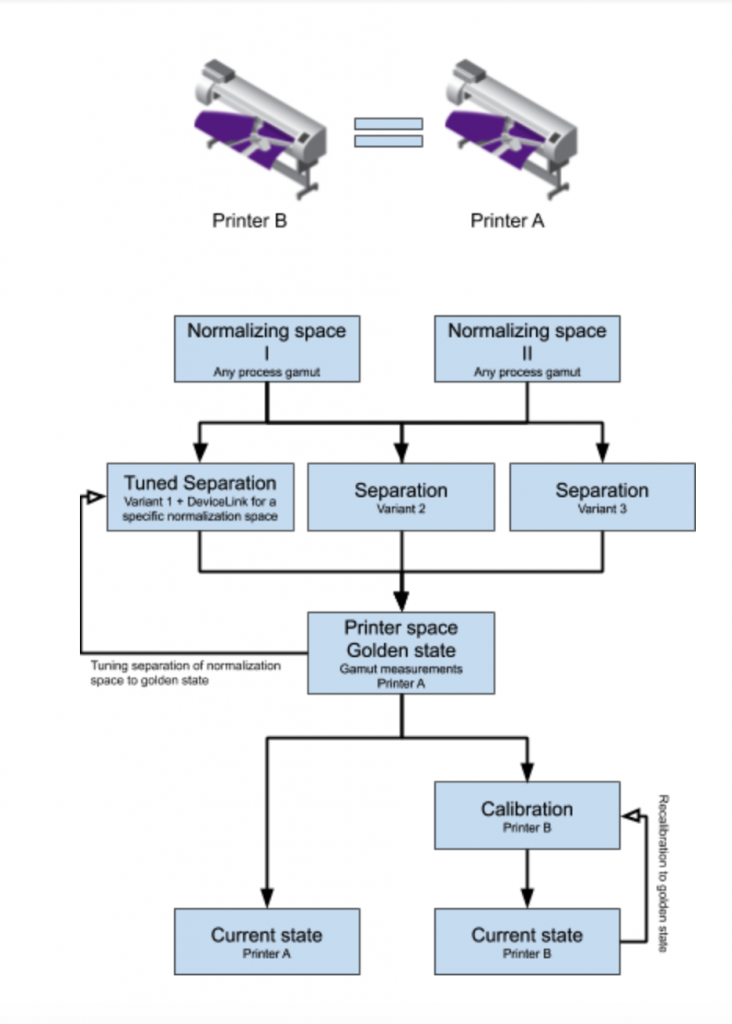
 2. Printer re-calibration
Over time a printer does not exactly print as it did of the moment of calibration, due to wear and environmental changes. Also other printers of the same make and model do not necessarily print the same as the printer used for calibration.
The measurement taken at the moment of the creation of the profile are considered the “Golden State” and the printer re-calibration method brings the printer back to that state or other printers to match that state.
By bringing the printer back to the Golden State all Variants (separations) will deliver the expected result again, so it is not needed to create the profile again when the circumstances changed.
The re-calibration process requires no decisions and can be executed automatically (for printers with build-in measurement devices) or by any operator semi-automatically. So no color management training and expertise is needed to bring the printer back to its original condition.
The default tolerances are ISO 12647-7, but tighter customer tolerances can be defined. It is not uncommon to have set the average deviation to a maximum of 1 ΔE. If the re-calibration process can not achieve these results within 3 iterations then it is wise to look for external causes like failing heads or high deviations between batches of media.
At that point that this process fails it is the moment for the operator to escalate the issue.
 3. Printer Simulation
Printer simulation is very similar to re-calibration but with the difference that 2 similar, but not identical substrates, printing processes or printers are synchronized to each other. Depending on the similarity between the substrates, processes and printers this method can still yield very close results.
Printer simulation has 2 options to achieve this goal:
Keep Separation : The separation is kept as much as possible untouched. The black generation is left as it is and therefore the visual impression is the same. This works well using similar printers with matching ink types.
Visual Match : The colors are separated using the earlier mentioned Visual Match rendering intent. This will use a different black generation and is suitable when the ink sets or types are not compatible.
After linking the profile to the printer to simulate the re-calibration method can be used to improve the matching and driving the deviations down. But higher tolerances should be allowed depending on much the media, process and printer is similar to the original combination.
 4. Profile Tuning
Profile tuning improves the accuracy of a (proofing) separation. It optimizes the result generated on the printer its Golden State proofing a selected reference/normalization space.
The tuning process requires no decisions and can be executed automatically (for printers with build-in measurement devices) or by any operator semi-automatically. So no color management training and expertise is needed to get a very close reproduction of the normalization process.
This method is commonly only used for the proofing use-case to have the closest match as possible to the reference/normalization space.
The recalibration method brings different printers close to each other or the original printer back to its original Golden State. The tuning process is on top of the recalibration to get rid of tolerances generated by the separation process and is applied on the DeviceLink created for the normalization-Golden-state combination.
The DeviceLink can even be manually edited to influence detailed separation decisions.
 5. Light Adaptation tool
Color calibration is assuming a light source of the D50 standard and all viewing of the output should be done under D50 light conditions. The reality is that in stores and virtually every other place the light conditions are different.
The Light Adaptation tools creates a copy of the existing variant (that is based on D50) and adapts it for different light conditions. This is achieved by printing a simple “pick a winner” chart with different variations of the same grey image. Bring this chart in the actual light condition and pick the one that is the most neutral. This chosen change will be applied to the copy of the variant. If needed this process can be repeated to get a very neutral appearance.
B. Use cases
Depending on the goal to achieve there might be different tools to be used to accomplish this. Below we will handle the following use-cases:
- Different substrates and different printers
- Same printer over time
- Pool of printers of the same type
- Pool of similar printers
- Different batches of media
- Similar media, different white point
- Commercial printing process
- Proof print of printing process
- Color cast in gray under different light
- None of the above
If the use-case is not listed above consult the support desk for advise on what would be the best suitable method to bring the process in line with the expectations.