Smart Forms
Smart Forms are a method to add additional custom metadata to the job XML that can be referenced later on, for example in a job label. They are available with a PrintFactory Connect subscription.
Enabling Smart Forms in Layout
To create a Smart Form you first need to enable it in Layout preferences:
After it has been enabled, you will see it in the available list of panels that you can toggle on/off. Make sure it is switched on:
Creating a Smart Form
You can now create your Smart Form. There are no default Smart Forms, meaning none are available until you create one. Click on the + button to create one:
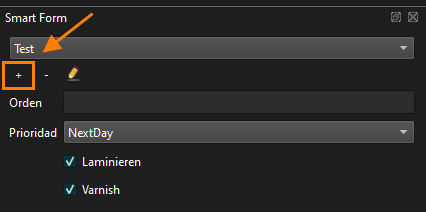
A window will appear. In here you need to create your Smart Form. Click on the + button to add a new entry:

Key – The tag that stores data within your job XML. You can reference this key later in a job label to retrieve the stored data.
Label – The name displayed in the Layout interface.
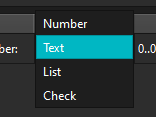
Type – The category of data being stored (explored in more detail below).
Settings – Configuration options for the selected data type. For example, if the type is 'List,' this section is where you define the list items.
Optional – This checkbox is currently non-functional. In the future, it will determine whether entering data in the SmartForm is mandatory or optional.
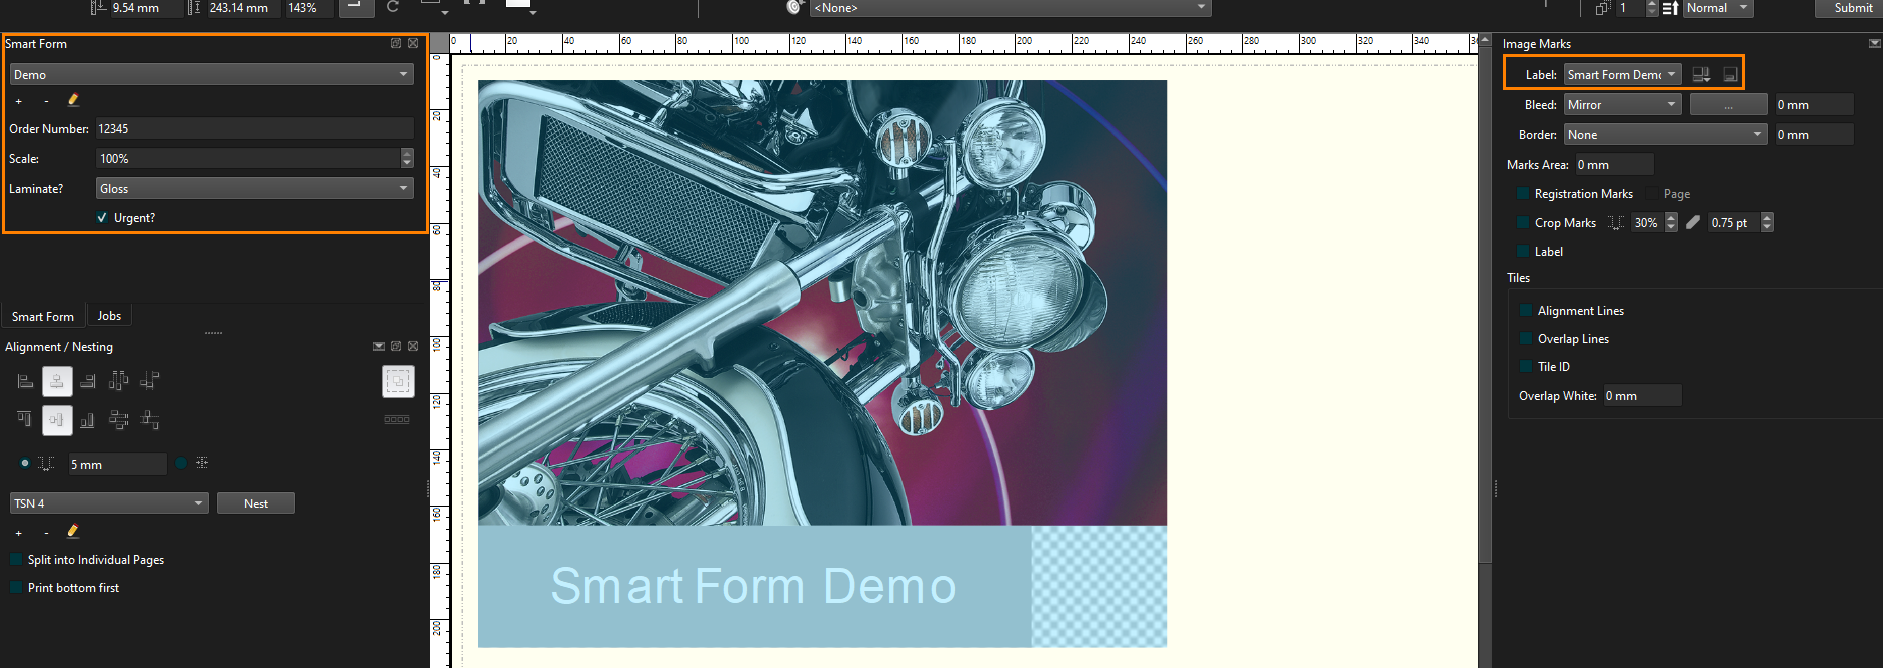
The example below shows a simple single Key Smart Form, using the data type 'Text'.
You will notice that the Layout interface (on the left) now shows my Label "Order Number:"
You will notice that the Layout interface (on the left) now shows my Label "Order Number:"
Data Types
There are 4 data types:
Number:

Here, you define the number format, set decimal places, and specify minimum and maximum values. Clicking OK applies these rules, controlling which numbers users can enter in the Smart Form.
Text:
Text is the most simplistic data type. There are no settings to decide, it is simply just text.
List:
A list lets the user choose from a drop down list. For example: Gloss Laminate or Matte Laminate
The format is Key=Label. Label is how it will appear in the Layout interface. Key is how it will be referenced in your job XML. Placing an asterisk as in the example above before 'None' will set that entry as the default selection in the interface.
Check:
A Checkbox. You can decide if it's True/False, or Yes/No, or any other two words:
Here is an example with all 4 data types included and how it looks like in the Smart Form user interface(on the left):
To change the settings again, double click the Settings.
You can now add artwork to your nest and assign SmartForm metadata to each image.

Click an individual image to add data to it, or select multiple images to apply the same data to all selected images. This step is crucial, as each artwork in your nest can have unique SmartForm metadata.
In the examples above, two images in my nest have entirely unique Smart Form data applied. A quick look at the job XML shows that the metadata is added. This means the Smart Form data was successfully applied:
Creating a Job Label with Smart Form data
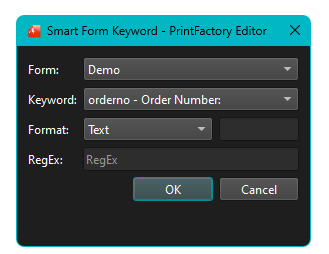
Now that custom metadata is added to the job XML, this means it can be referenced in a job label. To do this, open the Editor application. Go to the Text menu -> SmartForm Keywords:
Choose the Smart Form just created, and select the Keyword you would like in your label and click OK:
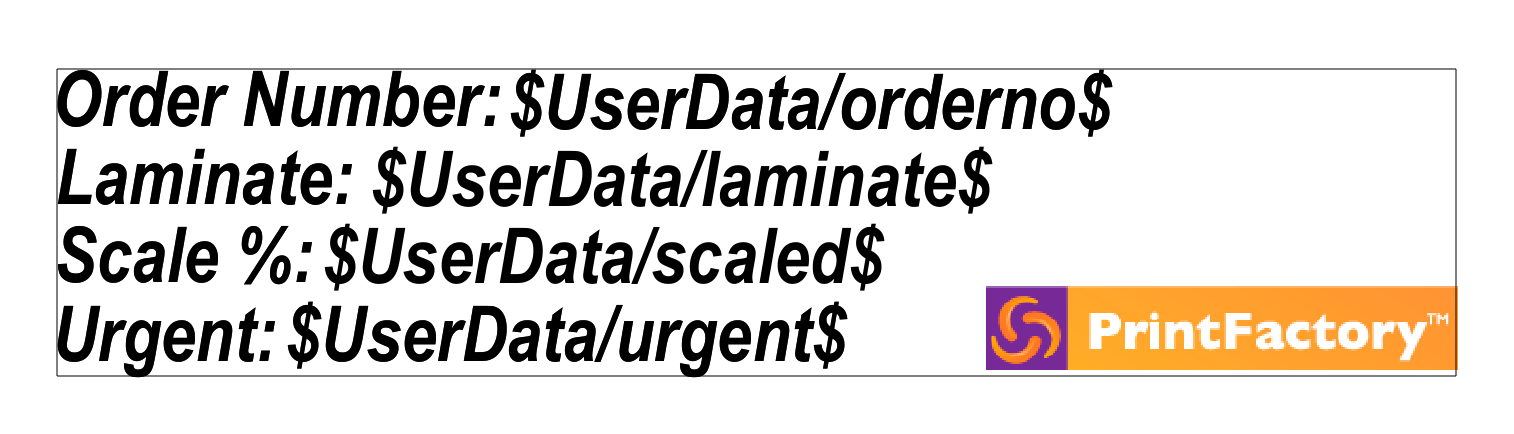
You will then see a variable data string appear on screen. Repeat the process to add other Keywords from your Smart Form and arrange them on the page:
All text inside the dollar strings will be replaced with the metadata in your SmartForm. The label can be redesigned in any way to suit your requirements. You might wish to add additional text as Labels, or add company logos or color:
When you are happy with your job label design, save it to the Cloud by going to Extra -> Job Labels -> Save...
Restart your RIP application and the label will then be available in Layout. In the example below the recently created Label is selected, and the SmartForm is filled:
The printed job looks like this:
The variable text inside dollar strings ($$) in my label has been replaced with the unique user-entered data in my Layout Smart Form!
Related Articles
Custom Job Label with VDP Keywords
VDP Keyword option helps the user to generates the variable text or its QR code using pre-defined keywords. Where: Text > VDP Keyword The video below illustrates how to create a custom job label using pre-defined Keywords. Please note: From V6.8.1 ...Smart Forms
The Smart Form tool enables the end-user to design a custom label with pre-defined fields that can be custom checked or entered in Layout. The information appears on the job as a label. Available in the PrintFactory Connect plan.Tile ID Custom Label
To create a tile ID label that can be placed on any side of the image you need to create a custom label. You can watch the video here showing you in more detail how to do this. The keyword required in your label is $TILEID$ Tile label positions After ...Custom Job Label
In this video you will learn how to create a custom job label. This label will be available for use in Layout and RIP Queues.Job Tracking
It is possible to track your jobs and the individual images in a nest by accessing the Tracking tab in the Cloud. From here you can preview the nested job & print part labels that can be kept with the job as it travels around your workplace. Lets ...