swissQprint Relief & Textured Printing
swissQprint UV inkjet printers are capable of impressive relief and textured printing, offering a range of capabilities that cater to the demands of various industries. These printers are recognized for their proficiency in creating layered relief prints, which open up a realm of possibilities for signage, decor, wood printing, and more.
This technique imparts a tactile and visual depth to the printed materials, adding textural elements that enhance the overall appearance and quality of the output. Whether you are looking to create intricate patterns, simulate natural surfaces, or add a tactile dimension to your designs, these printers provide the tools necessary to achieve these effects. They excel in replicating relief and textured details from original artworks, capturing even the finest brush strokes with precision. The addition of varnish in select areas, with varying gloss levels, provides the finishing touch, resulting in a reproduction that closely mimics the original art.
How is it done?
Capturing the Original Artwork: The first step in creating layered relief artwork for printing is to obtain a highly detailed 3D scan of the original artwork. The Metis 3D scanner and similar devices use various technologies to capture the physical details of the artwork. These scanners record the surface geometry of the object, including its texture, shape, and depth.
The data collected by the 3D scanner is processed to generate a digital 3D model of the artwork. This model contains all the surface information, including variations in depth and texture. The resulting 3D model serves as the foundation for the relief printing process. To prepare the artwork for relief printing, the 3D model is further processed to create a relief map. This map represents the depth and texture information as grayscale or heightmap data. In this map, lighter areas correspond to shallower sections, while darker areas represent deeper or textured regions.
You can download an example PDF here
Once you have your artwork you can begin the process of processing it through your PrintFactory RIP and sending it to the printer. You can open the file in Editor to gain a better understanding of how each page in your artwork is applying a varying % of ink in each step
The example artwork available at the link and pictured above contains 7 pages, the first 6 creating the build up of layers and the final 7th page containing a flood White undercoat followed by the full color final layer. This is a typical relief print artwork, usually with multiple pages where the final page will contain the White undercoat and the final color layer.
For SwissQ Amber:
Open the artwork into PrintFactory Layout & submit one page at a time to the printer so that the printer receives 7 different jobs, be sure to select the correct layering method in the job driver settings. If the build up layers contain white/varnish ink as well as color, be sure to turn on the inline special inks by checking them on in the top layer:
For the final page (in the above example, it is page 7) be sure to activate the White layer as it's own layer, as this will contain a flood White. Make sure that if the White spot color is not named "White" that you also use the special ink mapping component in Layout:
After you have repeated the job submission process in Layout, the swissQprint DFE(Digital front End) will receive the 7 separate jobs. You then need to use the swissQprint RTLView application to merge the jobs together so that the printer controller can interpret them as a single multilayered job & move the carriage height accordingly after each layer (page) is printed.
You can open RTLView by right clicking on any job in the DFE and selecting "Open RTLView", alternatively you can open it from the Desktop or Start menu if the required shortcuts are created. Once the application is opened you need to go to the File Menu -> Merge Files to Layer. The following dialogue box will open:
You can open RTLView by right clicking on any job in the DFE and selecting "Open RTLView", alternatively you can open it from the Desktop or Start menu if the required shortcuts are created. Once the application is opened you need to go to the File Menu -> Merge Files to Layer. The following dialogue box will open:
You now need to use the + icon to add the 7 separate RTL files that you sent to the swissQprint from PrintFactory Layout and order them correctly so that the 7th (or last) page is printed as the last layer:
Click OK and then you will be prompted to save the merged file as a new RTL file that the Amber or Lory front end will pick up and register as a new merged job containing the layers from the 7 pages you sent:
It is user discretion but advised to also increase the Quality (and thus the pass rate) of each layer, this increases the amount of ink used in each layer which can benefit the process:
For SwissQ Lory:
The Lory series printers, unlike the Amber series, do not include the RTLView application. To take advantage of the incremental carriage height increase, PrintFactory must deliver the job ready to print, rather than it being merged on the printer's front end. To achieve this, you need to configure the job for relief printing. To do this, check the option "Multipage to Multilayer" in Layout Print settings (You can also turn this on permanently in the PMM settings in Calibrator)
Click OK & then enter Layout, you can now open your relief map multipage PDF into Layout & nest them by"Job order" and then "Split into individual pages":
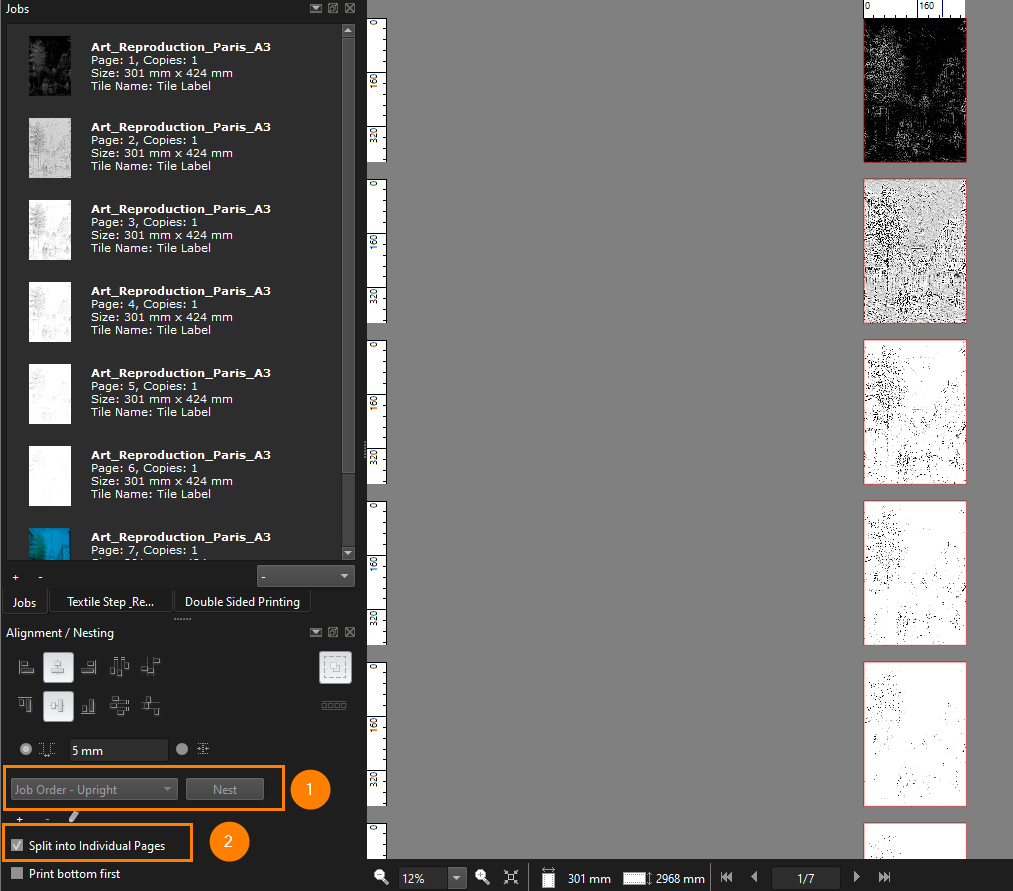
The Job Order nesting will ensure the pages are sent to the printer in the correct order (note: it is possible you need to re-order the pages so that the last page is output 1st, depending on how your PDF is configured) & the split into individual pages option will ensure the pages are output as separate layers on the printer, printed one after the other whilst increasing the carriage height each time.
When you have configured your RIP for relief printing (by turning on "Multipage to Multilayer earlier) then you will only see one layer available in the print settings palette in Layout. This is because the build up layers will be output using the same resolution and mode. If you are using white or varnish in your build up layers, be sure to activate the inline White & Varnish:
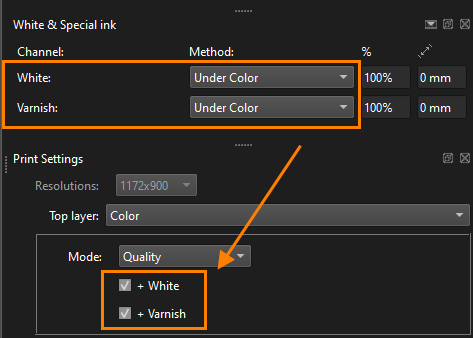
When you have configured your RIP for relief printing (by turning on "Multipage to Multilayer earlier) then you will only see one layer available in the print settings palette in Layout. This is because the build up layers will be output using the same resolution and mode. If you are using white or varnish in your build up layers, be sure to activate the inline White & Varnish:
Now submit the multipage job to the printer & it will output as one file to the printer with all pages layered & configured for relief printing. The printer will print each layer one after the other whilst moving the carriage height upwards to account for the height of the print. The final result is a textured relief print mimicking the original 3D scanned artwork:
Note: It is common that a lower resolution is required for the build up layer. If this is the case, you should omit the top color layer from your relief job & send this separately to the printer as a regular job and print it after the build up layers have completed.
Related Articles
Using swissQprint (Lory) printers with PrintFactory
Installation Relief Printing Drop Gloss Sandwich (3/5 layer with blocker) Multipage to Multilayer Double Sided Installation Installing the swissQprint driver in your PrintFactory RIP When setting up the swissQprint driver in the PrintFactory RIP, the ...Installing swissQprint printers with Lory DFE
When installing the swissQprint driver in the RIP, the specific content for this driver (e.g. ink channels, print modes,..) needs to be obtained from the .SQPE configuration file created on the Lory Digital Front End(DFE) of the printer. To find the ...SwissQprint Nyala-4: 3 and 5 layer printing - driver settings
Below is the layering in the driver setup to print 3 and 5 layers for the Nyala. To set up the File in Layout: Double sided needs to be enabled: more info on Layout setup for multi layering A. 3 Layer with same image Front and Back Layering = Color / ...Variable Data Printing (VDP)
The variable data process involves a template file, in which PlaceHolders and special keywords are defined. When Variable Data is used, these PlaceHolders and keywords will be replaced. In the Editor, Variable data can be done by importing files in a ...How to Set Up a Vutek Printer and use the Layered Printing with Specialty Inks
Connecting VUTEk printers usually run a LINUX version on their DFE with a folder \INCOMING\ already shared (if no share is yet created, check the DURST install instructions for sharing folders on a UNIX system or check with local IT; more info might ...